Thursday, March 15, 2007

Learn How To Build A Provider Framework For .NET

Contents

  1. The Problem
  2. The Solution
  3. So, The Framework
  4. Designing the Framework
  5. Implementing The Framework
  6. Developing A Simple Plug-in
  7. An Application To Test The Framework
  8. Design Variations
  9. Conclusion

Solution Architect: We should start concentrating more on frameworks!!

Dumb Developer: Well, I think I know about .NET framework. You mean, something like that?

After reading this article, you'll be able to

  • Change your mindset a little bit, and start thinking about 'frameworks' instead of just 'code'
  • Understand a lot about practically applying provider pattern in your projects
  • Gain much knowledge regarding how xml configuration files and providers work (especially in context of .NET)

1) The Problem

You are the Solution Architect of a BIG credit card company. You need to publish your credit card data to various banks, in order to get it approved. Basically, you send the card information (say, as an XML file) to a bank, the bank may or may not approve each card request, and you need to get the result back. The format you need to publish your card data is different from bank to bank, and you need a separate interfacing standard for each bank. Some banks support only FTP, and some other banks support only web services - and so on. Basically,

  • You want to fetch your card data from a data source
  • Convert it to the bank specific format (like, an XML file or a CSV file)
  • Push it to a bank for processing
  • Synchronously or asynchronously pull it back/get the result
  • Save the result for each card in your data base

You may do this process based on a scheduler - because you need to send card data to banks few times a day (once or twice), and to pull the results back.

And to make matters more interesting, more banks will be added to your system in future.

Well, now you need to propose a solution. Interesting.. huh?

2) The Solution

Let us see what all solutions are not good enough.

  • You should not think about developing your own scheduler - because you can use an existing scheduler to run your application to push/pull data to/from each banks.
  • You should not think about developing a separate application for synchronizing with each bank - because it is difficult to create, maintain, and deploy.

Let us see what all decisions are good design decisions.

  • You may develop an application to communicate with all banks. The application will load a list of plug-ins to push/pull data to/from banks from a configuration file
  • Your application can be scheduled using Windows Scheduler the way you like.

So finally, let us decide to

  • Build a 'Publisher' application, with some capability to load plug-ins and push/pull data

Now, you spoke with some of your friends and they asked you.. "Oh dude! Why you can't make it a generic interfacing Framework, so that we can re-use it?" - "Quite a good idea" you feel .. "But man, how exactly I make it a Framework?" :|

There we are :). Let us see.

3) So, The Framework

Basically a framework is

  • Something you can re-use (Give me the ready-made pack, I'll use it. Or else, get away).
  • A set of libraries and support programs (like, the .NET framework)
  • A set of pre-solved problems, to help you build solutions faster..

Solution Architect 1: "The day we complete building frameworks for all human work flows happening in this world, Solution Architects may go out of job".

Solution Architect 2: "No, Still we can design and build frameworks to fix our existing frameworks".

Solution Architect 3: "Dude, What about a framework to build frameworks?. Probably a meta-meta framework or a meta-meta-meta framework?".

Dumb Programmer (Thinks) : "All solution architects are dumb, lazy and crazy. They just draw diagrams and talk Greek. The whole project is in my head".

Let us come back to our topic. How to create a framework for solving the above design issues?. Here are some final thoughts regarding the framework we are going to build.

  • There should be a 'Publisher' framework to load plug-ins
  • The Publisher will call certain functions in each plug-in (say, Put and Get ) to push the data and to pull the data
  • A simple front end application will use the Publisher framework to load plug-ins from an XML file, and to push/pull data
  • We may use windows scheduler to schedule the front end application.

Now, as you see, we need to load plug-ins, after reading the information from an xml configuration file. Essentially, we need to separate some kind of functionality from the actual application - i.e., the publishing logic (push/pull data to/from bank) should be decoupled from the actual application (loader/scheduler) through a plug-in model - so that we can add/remove and configure plug-ins at a later stage very easily.

Hence,

  • When a new bank comes in, we can develop a simple plug-in for data push/pull and deploy it easily.
  • Modify the configuration file, so that the loader will load it.

Well, this may ring the bell. You suddenly think.. "Separating functionality using a plug-in based model is nothing new - and an existing design pattern should be in existence for this". Well, that is what (actually, some what :-) ) provider pattern is all about. Let us see how we can design our framework, around the provider pattern, to solve the design issue.

If you are not so familiar with design patterns, you are lagging at least one step. Stop here, go and read my articles on 'Applying Design Patterns' - Part 1 and Part 2, Then come back.

4) Designing The Framework

Altogether, the idea about 'provider pattern' is quite simple. There are various ways of implementation - here is a quite simple one.

  • You have a well defined plug-in interface - public interface IMyInterface , or even an abstract class, in your Framework project
  • Your plug-in classes will implement this interface or abstract class. The trick is, your plug-in classes that implements your interface will be residing (most probably) in separate library files (say, dll files)
  • At run time, your framework will read the list of available plug-ins from a configuration file (most probably, an XML file)
  • You load those plug-in classes using Reflection mechanism (System.Reflection in .NET) and create an object of the class
  • You can now call the methods inside your class, through your interface

Much like this.

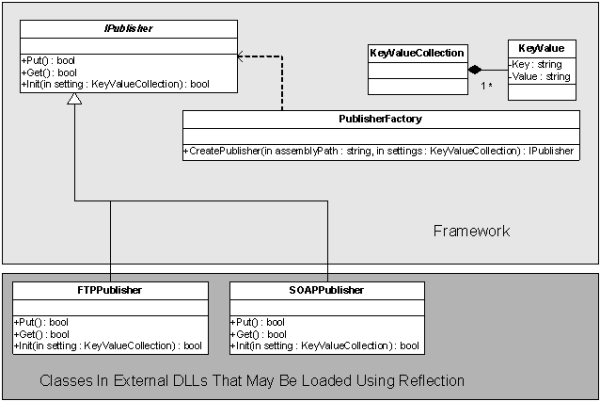
  • IPublisher is our interface in the Framework, which defines our abstract functions.
    • The Init function will be called initially when a publisher is instantiated, to pass the settings to the newly loaded publisher
    • Other functions like Get and Put are used for specific purposes - say, to push and pull data to/from the bank.
  • PublisherFactory is our factory class - which takes two parameters as input (Don't confuse this with Factory pattern or something. Now, just consider it as a class name)
    • The assembly name (from where we should load the plug-in class)
    • The settings to pass to the publisher when it is loaded.

FTPPublisher and SOAPPublisher are two plug-in classes, which implements the IPublisher interface. KeyValueCollection is a set of name-value pair, to pass some settings (like Host=myhost, Port=30).

5) Implementing The Framework

Now the easiest part - implementing the framework (Unfortunately, most people start thinking from this phase only).

Credits to Sandeep (sandeepkumar@sumerusolutions.com) for implementing the actual code, based on the design

5.a) Creating The IPublisher Interface

As we discussed, the interface definition is pretty simple. The type SettingCollection is synonymous to KeyValue collection we discussed above.

/// <summary>
/// The interface 
for an IPublisher
/// </summary>
public interface IPublisher


    {


/// <summary>
/// To publish data
/// </summary>
void Put();
/// <summary>
/// To retreive data
/// </summary>
void Get();

/// <summary>
/// Function called 
by publisher factor to pass the settings (settings is a NameValue collection)
/// </summary>
/// <param name="settings">
/// </param>
void Init(Sumeru.Publisher.Framework.Data.SettingCollection settings);


}


5.b) Creating The PublisherFactory

The publisher factory has a very simple static function, CreatePublisher.

Publisher factory simply loads the type (i.e, our plug-in class) from the assembly, creates an object of it, and return it. Looks so simple, huh? If the type we loaded is not an IPublisher, an error may occur at the line ipub=(IPublisher) pub because explicit casting may fail. In this way, we make sure that all plug-ins we load should obey the IPublisher interface. It will also call the init function to pass the parameters to the plug-in after loading it.

/// <summary>
/// 
Summary description for PublisherFactory.
/// </summary>
public abstract 
class 
PublisherFactory
{
 
/// <summary>
/// Creates the 
publisher and return a type of IPublisher
/// </summary>
/// <param name="assembly">The path to the assembly</param>
/// <param name="className">The class name to instantiate</param>
/// <param name="settings">The settings collection</param>
/// <returns></returns>
public static IPublisher CreatePublisher(string assemblyName, string 
className,
                     
Sumeru.Publisher.Framework.Data.SettingCollection settings) 

{
try 

{

IPublisher ipub;

Assembly 
asm=Assembly.LoadFrom(assemblyName); 
System.Type 
type=asm.GetType(className);
object pub=Activator.CreateInstance(type); 

ipub=(IPublisher) pub;
ipub.Init(settings);
return ipub;
}
catch (Exception ex) 
{
throw 
ex;
}
} 


}


5.c) Creating The PublisherLoader Class

If you remember, one of our requirements were to load the plug-in information from an XML file. PublisherLoader class is exactly for that. This class is not there in the above UML diagram - pardon me, but still it is a part of the Framework. It will load an XML configuration file, load each plug-in specified, instantiate it by calling the PublisherFactory, and call other functions in the plug-in like Get() and Put(). Before we go to the class definition, here is some more meat regarding how to create your own xml configuration files and how to actually read them.

The XML Configuration File

For eg, consider that we should allow our Framework to load plug-ins by reading a configuration file like this.

<Publishers>
<!-- FTP Publisher -->
<Publisher AssemblyName="Sumeru.Publisher.FTPPublisher.dll" 
                
ClassName="Sumeru.Publisher.FTPPublisher.FTPPublisherPlugin" Name="FTP">
<Setting Key="Host" Value="myhost1"/>
<Setting Key="Port" Value="21"/>
<Setting Key="Password" Value=""/>
<Setting Key="UserName" Value=""/>
<Setting Key="FileToDownload" 
Value=""/>
<Setting Key="DownloadToPath" 
Value=""/>
<Setting Key="FileToUpload" 
Value=""/>
</Publisher> 

<!-- SOAP Publisher -->
<Publisher AssemblyName="Sumeru.Publisher.SOAPPublisher.dll" 

               
ClassName="Sumeru.Publisher.SOAPPublisher.SOAPPublisherPlugin" Name="SOAP">
<Setting Key="URL" Value="http://www.myhost.asmx"/>
<Setting Key="Port" Value="80"/>
</Publisher> 


</Publishers> 

Each Publisher has various properties like AssemblyName and ClassName for specifying the plug-in assembly path (dll) and the name of the plug-in class. Also, each publisher has a set of settings, like Host and Port. These settings are passed to the plug-in class by the PublisherFactory class when we instantiate an object of the plug-in, by calling the Init function. How this works? Read on.

How to read a configuration file like above? Fortunately it is very simple in .NET. The steps are,

<ul> <li>Create an XML schema to describe the configuration file format (I.e, to describe the elements and attributes in your configuration file) </li> <li>Create a set of classes from the XML Schema (to serialize and de-serialize an xml document specific to this schema) </li> <li>Use these classes to read a configuration file like above, to an object model. </li> </ul>

Creating The XML Schema

So, first let us create the XML schema.

<?xml version="1.0" encoding="utf-8" ?>
<xs:schema id="Publisher" 
targetNamespace="http://tempuri.org/Publisher.xsd" elementFormDefault="qualified"
xmlns="http://tempuri.org/Publisher.xsd" xmlns:mstns="http://tempuri.org/Publisher.xsd"
xmlns:xs="http://www.w3.org/2001/XMLSchema">


<xs:element name="Publishers">
<xs:complexType>
<xs:sequence>
    <xs:element ref="Publisher" maxOccurs="unbounded" />
</xs:sequence>
    
<xs:attribute name="Version" type="xs:string" />
</xs:complexType>
</xs:element>


<xs:element name="Publisher">
<xs:complexType>
<xs:sequence>
    <xs:element ref="Setting" maxOccurs="unbounded" />
</xs:sequence>
    <xs:attribute name="Name" type="xs:string" />
    <xs:attribute name="AssemblyName" type="xs:string" />
    <xs:attribute name="ClassName" type="xs:string" />
    <xs:attribute name="Version" type="xs:string" />
</xs:complexType>
</xs:element>


<xs:element name="Setting">
<xs:complexType>
<xs:sequence></xs:sequence>
    <xs:attribute name="Key" type="xs:string" />
    <xs:attribute name="Value" type="xs:string" />
</xs:complexType>
</xs:element>


</xs:schema>  

If you see the above schema, there are three elements, Publishers, Publisher and Setting. It is easy to understand, still, if you see, the Publishers element can contain more than on Publisher element. A Publisher element has four attributes - Name, AssemblyName, ClassName and Version - and a Publisher element can contain more than one Setting element. A Setting element has two attributes- a Key and a Value. This schema exactly describes the configuration document structure we need. Save the schema to a file, named Publisher.xsd

Creating A Set Of Classes

Now, to create a data structure out of our schema, I've several options. My favorite option is to use XsdObjectGenerator. It will generate a set of classes, which is capable of representing my above schema. I.e., it will create classes to create an object model of the schema, to which I can de-serialize my configuration file.

Let us create the classes from the command line, using xsdobjectgen.

xsdobjectgen Publisher.xsd /n:Sumeru.Publisher.Framework.Data

This will create an object model based on elements in Publisher.xsd (i.e, a set of classes like Publishers, Publisher, Setting etc along with attributes) to describe the elements in Publisher.xsd. The /n switch specifies the namespace for the newly created classes.

And this created a file Sumeru.Publisher.Framework.Data.cs with all the classes - please see the attached source code if required. There'll be a Sumeru.Publisher.Framework.Data.Publishers Class (If you remember, Publishers is the root element according to our schema), and we can use an object of this class to de-serialize an xml document.

Load The Configuration File

This part is pretty simple. We just create an object of Publishers class, and de serialize the xml file to it.

Sumeru.Publisher.Framework.Data.Publishers pubs;
XmlSerializer xsr=new XmlSerializer(typeof(Framework.Data.Publishers));
pubs=(Framework.Data.Publishers) xsr.Deserialize(new StreamReader("c:\config.xml"));

If you remember, Publishers element has a collection of Publisher element, and each Publisher element has few attributes like Class Name and Assembly Name.

We iterate the Publisher elements, to pass the class name and assembly name to the PublisherFactory we wrote earlier. This will dynamically load a publisher, and may return us an IPublisher object - if the assembly name and class name is specified correctly in the XML file. Then, we may call our custom functions

The PublisherLoader Class

The PublisherLoader class does all this work (though it is very simple)

/// <summary>
/// Summary description for PublisherLoader.
/// </summary>
public class PublisherLoader
{

/// <summary>
/// Load all the publishers from the configuration, and create an instance
/// using the factory. Also call our custom functions.
/// </summary>
/// <param name="path"></param>
public void LoadPublisher(string path) 
{
Framework.Data.Publishers pubs;
XmlSerializer xsr=new XmlSerializer(typeof(Framework.Data.Publishers));
pubs=(Framework.Data.Publishers) xsr.Deserialize(new StreamReader(path));
foreach (Framework.Data.Publisher p in pubs) 
{
Framework.IPublisher ipub=Framework.PublisherFactory.CreatePublisher(p.AssemblyName,
                                      p.ClassName,p.SettingCollection);
ipub.Get();
ipub.Put(); 
}
}
}

Here, as you see, we are loading the configuration, iterate each publisher element, and passes the class name and assembly name to the PublisherFactory for creating an IPublisher object. Then we are calling the functions Get() and Put().

If you notice, we are also passing the Setting collection of a publisher element to the PublisherFactory, and the PublisherFactory will in-turn pass this Setting collection by calling the Init(..) function in a Publisher object during the time of instantiation (See the code of PublisherFactory).

Now, we are almost done. Let us write a simple plug-in for our framework now.

6) Developing A Simple Plug-In

To develop a plug in, I've done the following steps.

  • Created a class library project named Sumeru.Publisher.FTPPublisher
  • Added a reference to our Framework project
  • Created a class named FTPPublisherPlugin by implementing the IPublisher interface in our framework.

Here is the FTPPublisherPlugin Class. If you see, it just implements all the functions defined in IPublisher.

You may need to add your own code for putting and getting files to/from ftp server, in place of showing message boxes.


/// <summary>
/// A Simple Plugin Class
/// </summary>
public class FTPPublisherPlugin : Sumeru.Publisher.Framework.IPublisher 
{

private System.Collections.Hashtable ht=new System.Collections.Hashtable();

/// <summary>
/// To publish 
data
/// </summary>
public void Put() 
{
//Put your data
//Note: Implement proper error handling for invalid 
parameters
string host=(string)ht["Host"];
string port=(string)ht["Port"];
System.Windows.Forms.MessageBox.Show("Putting File To " + 
host + "," + port); 
//Write Your own ftp 
code to put file
}
/// <summary>
/// To retreive data
/// </summary>
public void Get() 
{
//Get your data
//Note: Implement proper error handling for invalid 
parameters
string host=(string)ht["Host"];
string port=(string)ht["Port"];
System.Windows.Forms.MessageBox.Show("Getting File from " 
+ host + "," + port); 

//Write Your own 
ftp code to get file
 
}

/// <summary>
/// Init Function called by publisher factory to pass the settings
/// </summary>
/// <param name="settings">
/// </param>
public void Init(Sumeru.Publisher.Framework.Data.SettingCollection settings)
{
//Keep our settings locally 
in a hash table
//Implement proper error handling for duplicate keys
foreach(Framework.Data.Setting s in settings) 
{
ht.Add(s.Key,s.Value);
}

}

}


7) An Application To Test The Framework

Now, let us develop a very simple Loader application, which consumes our Framework. It basically invokes the LoadPublisher function in PublisherLoader class we created earlier. I created a form, with a text box which has the path to the Xml configuration file.

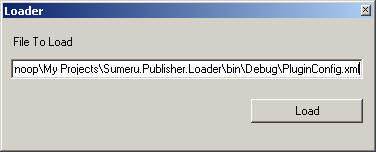
The XML Configuration file has information to load our newly written Plug-in. I'm just loading the same plug-in twice with different settings. Try developing yet another plug-in, and add a new publisher element to load that. Make sure that you are copying the dll to the path of this Loader app - if you are not explicitly specifying the full path for the dll.

<?xml version="1.0" encoding="utf-8" ?>
<Publishers xmlns="http://tempuri.org/Publisher.xsd">
<!-- FTP 
Publisher - A simple ftp transaction to host 1 -->
<Publisher AssemblyName="Sumeru.Publisher.FTPPublisher.dll" 
ClassName="Sumeru.Publisher.FTPPublisher.FTPPublisherPlugin" 
Name="FTP">
<Setting Key="Host" Value="myhost1"/>
<Setting Key="Port" Value="21"/>
<Setting Key="Password" Value=""/>
<Setting Key="UserName" Value=""/>
<Setting Key="FileToDownload" Value=""/>
<Setting Key="DownloadToPath" Value=""/>
<Setting Key="FileToUpload" Value=""/>
</Publisher> 
<!-- FTP 
Publisher - A simple ftp transaction to host 2 -->
<Publisher AssemblyName="Sumeru.Publisher.FTPPublisher.dll" 
ClassName="Sumeru.Publisher.FTPPublisher.FTPPublisherPlugin" 
Name="FTP">
<Setting Key="Host" Value="myhost2"/>
<Setting Key="Port" Value="21"/>
<Setting Key="Password" Value=""/>
<Setting Key="UserName" Value=""/>
<Setting Key="FileToDownload" Value=""/>
<Setting Key="DownloadToPath" Value=""/>
<Setting Key="FileToUpload" Value=""/>
</Publisher> 
 
</Publishers>


In the Load button click, I have the code to load the plug-ins in this 
configuration file, like


private void btnLoad_Click(object sender, System.EventArgs e)
{
PublisherLoader pl=new PublisherLoader();
pl.LoadPublisher(this.txtFileToLoad.Text);
}


As you see, we are using the PublisherLoader class, to read the configuration file, and to load the plug-ins as explained earlier. Now, if you click Load button, the plug-ins will be loaded, and you may see the message boxes from the plug-in we developed. (Let us keep it simple ;)


8) Design Variations

Here are some interesting design variations so that you can implement for practice, and for some additional brainstorming.

  • Yesterday I spend some time with Abhilash - and he was mentioning how he is planning to use a script engine in his provider-like framework. Instead of developing separate classes as plug-ins, there will be a core engine, and it will load script files which can be interpreted by the core engine from a configuration file. That framework is mainly for data mapping between protocols.
  • Right now, the framework is not passing any data to the plug-ins (other than the settings). Some times (most of the times), this framework may need to pass data to/from plug-in functions (like, data to put and get). If the data passed from Framework to put/get functions are standardized (i.e., a pre-defined schema), everything is fine - but what if the data format is not pre-defined? How will you solve this issue? Post your comments here :)

9) Conclusion

Hope you enjoyed it - I tried to keep it very simple.

Some more information if you are health conscious.

  • When you work with your comps, normally your entropy will go high (just if you are a smart programmer), and this may decrease the level of water in your body. Make sure that you are drinking lots of water - this will eliminate a lot of stress, strain and depression.

And finally, I'll also recommend an Art Of Living Part I workshop for you (See http://www.artofliving.org/ and have a look at the Courses). It is an interactive workshop of 18 hours spread over 6 days. As it did for me, I hope that it may help you to find the right balance between your work and life - to improve the mental strength and clarity of your mind, and to improve the quality of your life.

Here are some other popular articles I wrote.

You can visit my own website at http://amazedsaint.blogspot.com/ for more articles, projects and source code

Also, you may view my tech-bits blog , download my opersource projects. Also, if you have some time to read some insights, see my intuitions blog

Thanks a lot :)


Friday, June 09, 2006

NXML - An XML Based language for Neural Network Processing

Contents


1. Overview

What about developing an XML based language, to help you create, train and run your own neural networks?

These articles about nxml will essentially explain two important points.

  1. What is neural xml, and how it can be used for neural network processing
  2. What are the programming concerns, design concepts, and implementation details of nxml.

In this article, we will see answer for the first question. In the next article, we will go in deep to the design and internals of nxml.

Now, let us see how this articles may help you.

If you are a neural network enthusiast, or if you want to get some initial concepts about neural networks, you can use NXML to

  • Generate your neural networks easily and save and load it from/to xml file
  • Load your neural network using nxml to Train it, and run it - and even save the trained network back so that you can use it later.

If you are a programmer

  • You can understand how to develop and implement an xml language specification for various purposes.
  • You can learn how easily you can create data structures in your project from xsd schemas.
  • You can gain some insights regarding neural network programming and implementation.

We will also see how Neural XML (NXML) can be used for an 'intelligent' task - i.e, for identifying images based on various criteria (with an example of an interesting 'pseudo' brain tumor detection example)

Before We Begin:

Just for using Neural XML and to understand these concepts, you don't need to understand a lot about Neural Network Theory or even about BrainNet library. How ever, if you are a beginner (not in programming, but in neural networks), I strongly recommend you to read the below tutorials as an introduction - because that will provide you a solid foundation to begin neural network programming, and to understand neural network concepts.

Read them here,

Or you can go to my website and read them (and a lot of other articles) there - Click http://amazedsaint-articles.blogspot.com/

2. What is Neural XML?

In this part, we will discuss what exactly is Neural XML, and how to use it.

As you already know, a neural network consists of various layers, and each layer has a number of neurons in it. Initially, we will train the neural network, by providing the inputs to the input neurons, and by providing the output to the output neurons. Once the neural network is trained, you can run it.

2.A) How To Begin

Let us see how to begin with neural xml.

Step 1: Get Neural XML

Where to get Neural XML?

The binaries for nxml, and images and other files required for this article, is available.

The full source code of Neural XML, and BrainNet Neural Network library is available.

Download the project, and build it. Add Neural XML bin folder to your path, so that you can run nxml in command prompt from any where.

Step 2: Run NXML and have a look at it.

Run nxml tool from the command prompt. If you run nxml with out any parameters, it will give you the following message.


C:\BrainNet\Nxml\Bin> nxml

You can use this program to create a multi layer back prop network, train it and run it All Rights Reserved (C) 2005-2006, Anoop Madhusudanan, http://amazedsaint.blogspot.com Syntax: ----------- Syntax1: nxml -gen NeuronsInLayer1,NeuronsInLayer2,NeuronsInLayerN filename Syntax2: nxml -start filename Use the -start switch to train an run a network using an nxml file. Use the -gen switch to create a back propagation network and save it to a file Examples: ----------- Example1: nxml -gen 10,10,4 mynetwork.xml The above example will create a network with 3 layers - 10 neurons in input layer, 10 neurons in hidden layer, and 4 neurons in output layer. Example2: nxml -gen 3,3,3,2 mynetwork.xml The above example will create a network with 4 layers - 3 neurons in input layer, 3 neurons in first hidden layer, 3 neurons in second hidden layer, and 2 neurons in output layer. Example3: nxml -start mynetworktrian.nxml The above example will execute the mynetworktrain.nxml file to train and run the network

I think this will give you a fair understanding regarding how to use nxml command line tool. Anyway, let us dig in to the matter a little deeper.

2.B) Illustration 1 - A Simple NXML Application - Creating Digital Gates

Now, an interesting example. Let us see how we can create a 2-2-1 neural network (2 neurons in input layer, 2 neurons in hidden layer, and 1 neuron in output layer) to represent a digital gate (like and AND gate, or OR gate), using NXML. Then, we will train our 2-2-1 network to perform functions like AND, OR, XOR etc. See the previous articles for more information about neural networks (read them here Part I and Part II). If you examine my previous article, you can see that how we did this earlier, but using .NET code. This time we are doing the same - but using our own language, that is NXML.

Fig: A Simple 2-2-1 Network

What We Are Going To Do:

Training and running an application using NXML involves,

  • Creating a neural network using nxml tool
  • Training the neural network you created
  • Running the neural network

Let us see how to do this.

Step 1: Creating A 2-2-1 Neural Network

To create a 2-2-1 neural network. You can use the -gen switch of nxml. The syntax is,

Syntax: nxml -gen NeuronsInLayer1,NeuronsInLayer2,NeuronsInLayerN filename As the first parameter, we will pass the number of neurons in each layer, separated with commas. In this case, it is 2,2,1 - i.e, 2 input neurons, 2 hidden layer neurons and 1 output neuron. The second parameter is the file name.

Run nxml with the following arguments to create a 2-2-1 network and store it in gate.xml

nxml -gen 2,2,1 gate.xml

<html> <head> </head> If you open and examine the gate.xml file generated by nxml, you will see the following information. Under the root tag 'Network', there are various 'Layer' tags. As you can see, the network consists of three layers, Layer0, Layer1 and Layer2. Layer0 consists of two neurons L0N0 (0th neuron in 0th layer) and L0N1 (1st neuron in 0th layer) and so on.

Now, just have the look at the neuron L1N0 (0th Neuron in Layer1). You can see a tag 'Connections' - which define which all neurons in previous layer is connected to this neuron.<html> Please note that each connection input holds a 'weight'.

Also, each neuron has a Bias, Output a<html>nd Delta value, which holds these parameters of the neuron.<html>

File: Gate.xml<html>

<code><?xml version="1.0" encoding="utf-8"?>
<Network>
  <Layer Name="Layer0">
    <Neuron Name="L0N0">
      <Bias>0.7982105016708374</Bias>
      <Output>0</Output>
      <Delta>0</Delta>
    </Neuron>
    <Neuron Name="L0N1">
      <Bias>-0.3051917552947998</Bias>
      <Output>0</Output>
      <Delta>0</Delta>
    </Neuron>
  </Layer>
  <Layer Name="Layer1">
    <Neuron Name="L1N0">
      <Bias>-0.74571740627288818</Bias>
      <Output>0</Output>
      <Delta>0</Delta>
      <Connections>
        <Input Layer="0" Neuron="1" Weight="0.25023746490478516" />
        <Input Layer="0" Neuron="0" Weight="-0.68162941932678223" />
      </Connections>
    </Neuron>
    <Neuron Name="L1N1">
      <Bias>0.044701099395751953</Bias>
      <Output>0</Output>
      <Delta>0</Delta>
      <Connections>
        <Input Layer="0" Neuron="1" Weight="-0.41200506687164307" />
        <Input Layer="0" Neuron="0" Weight="-0.14756286144256592" />
      </Connections>
    </Neuron>
  </Layer>
  <Layer Name="Layer2">
    <Neuron Name="L2N0">
      <Bias>-0.32655441761016846</Bias>
      <Output>0</Output>
      <Delta>0</Delta>
      <Connections>
        <Input Layer="1" Neuron="1" Weight="-0.9166187047958374" />
        <Input Layer="1" Neuron="0" Weight="-0.4252774715423584" />
      </Connections>
    </Neuron>
  </Layer>
</Network>

Step 2: Training the Neural Network

Now, let us train gate.xml to perform three functions - AND, OR and XOR. To train the network, we'll

  • Create a 'trainer' nxml file, trainGate.n.xml, which holds information to train the network
  • Execute the trainer nxml file on our neural network - i.e, gate.xml

File: trainGate.n.xml

<code><?xml version="1.0" encoding="utf-8"?>
<NXML>
  <Network LoadPath="gate.xml" SaveOnFinish="true" SavePath="OR.xml">
    <DataBlock Type="Train" TrainCount="2000">
      <PatternData InputType="Pattern" InputValue="00" OutputType="Pattern" OutputValue="0" />
      <PatternData InputType="Pattern" InputValue="01" OutputType="Pattern" OutputValue="1" />
      <PatternData InputType="Pattern" InputValue="10" OutputType="Pattern" OutputValue="1" />
      <PatternData InputType="Pattern" InputValue="11" OutputType="Pattern" OutputValue="1" />
    </DataBlock>
  </Network>
  <Network LoadPath="gate.xml" SaveOnFinish="true" SavePath="AND.xml">
    <DataBlock Type="Train" TrainCount="2000">
      <PatternData InputType="Pattern" InputValue="00" OutputType="Pattern" OutputValue="0" />
      <PatternData InputType="Pattern" InputValue="01" OutputType="Pattern" OutputValue="0" />
      <PatternData InputType="Pattern" InputValue="10" OutputType="Pattern" OutputValue="0" />
      <PatternData InputType="Pattern" InputValue="11" OutputType="Pattern" OutputValue="1" />
    </DataBlock>
  </Network>
  <Network LoadPath="gate.xml" SaveOnFinish="true" SavePath="XOR.xml">
    <DataBlock Type="Train" TrainCount="4000">
      <PatternData InputType="Pattern" InputValue="00" OutputType="Pattern" OutputValue="1" />
      <PatternData InputType="Pattern" InputValue="01" OutputType="Pattern" OutputValue="0" />
      <PatternData InputType="Pattern" InputValue="10" OutputType="Pattern" OutputValue="0" />
      <PatternData InputType="Pattern" InputValue="11" OutputType="Pattern" OutputValue="1" />
    </DataBlock>
  </Network>
</NXML>

The above code, to train the network, is written according to the nxml specifications. Kindly see this brief introduction to NXML language.

NXML LANGUAGE - A BRIEF OVERVIEW
NXML language is pretty straight forward. To perform an action on a neural network, you should load it initially. Using NXML, you can specify which network to load, what operation to perform on the network, etc. The 'Network' tag is used to load an xml file from disk, like the one we generated earlier. The 'DataBlock' tag specifies which operation we should perform on the network.

For example, the following line specifies that the gate.xml should be loaded, and it should be saved as OR.xml after performing the operations.

<Network LoadPath="gate.xml" SaveOnFinish="true" SavePath="OR.xml">

The Network tag has the following attributes.

  • LoadPath - The path of the xml file which holds our network. In this case, it is Gate.xml
  • SaveOnFinish - Specify whether the network should be saved after a DataBlock operation is performed
  • SavePath - You can save the network to a new file path.

A DataBlock tag specifies which operation we are going to perform. For example, the following tag specifies that the network should be trained 2000 times, using the data inside this data block

<DataBlock Type="Train" TrainCount="2000">

It has the following attributes.

  • Type - The type of operation to perform. It can be either Train or Run
  • TrainCount - The number of times the operation should be performed. It is not required if Type attribute is Run.

Also, a data block holds the data which should be used to train the network. For e.g., In our above example, the first data block holds data equivalent to an OR truth table. Data inside a Data block can be either PatternData or ImageData. We are using PatternData here. Use of ImageData tag will be explained later.

Attributes of PatternData include

  • InputType - species the format that we provide as input. Input Type can be Pattern, Array, Number and Character.
  • InputValue - Input value represents the value we provide for as input to the neural network. This will be parsed based on the InputType.

For example, if Input Type is 'Pattern', then then each bit in the input value is fed directly to the neurons in the input layer. For example, in the following case, 1 and 1 will be input to the neurons in first layer, and 0 is the target output for the first neuron in output layer.

<PatternData InputType="Pattern" InputValue="11" OutputType="Pattern" OutputValue="0" />

If Input Type is Number, then the equivalent binary value is fed. For example, a tag like

<PatternData InputType="Pattern" InputValue="11" OutputType="Pattern" OutputValue="0" />

is equivalent to

<PatternData InputType="Number" InputValue="3" OutputType="Number" OutputValue="0" />

Because, 11 is the binary representation of 3. Please bear in mind that the maximum input value you can provide to a 2-2-1 network is 3 - because 3 is the highest number we can represent using 2 bits (A 2-2-1 network cannot take more than two inputs at a time)

Also, if you want to provide an array of decimal values, you can use

<PatternData InputType="Array" InputValue="0.9,0.3" OutputType="Number" OutputValue="0" />

If you want the values in decimal format (single), provide Array as the input or output type.

If you are using input type as character, you should need at least 8 neurons in input layer - because a character requires 8 bits to represent it. OutputValue tag is not considered, and the value over written, if the data block type which holds this pattern data is 'Run' instead of 'Train'.

As another example, let us check some valid inputs for a 3-3-2 neural network with 3 neurons in input layer, and 2 neurons in output layer.

<PatternData InputType="Array" InputValue="0.9,0.8, 0.1" OutputType="Array" OutputValue="0.9,0.2" />

<PatternData InputType="Pattern" InputValue="110" OutputType="Pattern" OutputValue="10" />

Now, to train the neural network, we can invoke the nxml interpreter using the following command, in the command prompt.

nxml -start trainGate.n.xml

This causes the nxml interpreter to process trainGate.n.xml. This will interpret the three 'Network' tags, and the following files are generated - i.e, OR.xml, AND.xml and XOR.xml, (as specified in trainGate.n.xml). Have a look at these XML files, and see the change of values in connection weights, bias etc.

Step 3: Running the Neural Network

Now we have three trained neural networks. OR.xml which can perform functions of an OR gate, AND.xml which can perform functions of an AND gate and XOR.xml which can perform functions of an XOR gate.

Let us see how to 'run' these networks. Let us create a file, runGate.n.xml, to run these networks.

The only change is that, the Type of Datablock is changed to 'Run' from 'Train'. Also, we are not providing any OutputValues - because we expect the network to predict and write these output values. Kindly note that the network xml files (like or.xml, and.xml and xor.xml) are not undergoing any changes - because we are running the network, and not training it.

File: runGate.n.xml before running it with nxml interpreter

<code><?xml version="1.0" encoding="utf-8"?>
<NXML>
  <Network LoadPath="or.xml" SaveOnFinish="true" SavePath="or.xml">
    <DataBlock Type="Run">
      <PatternData InputType="Pattern" InputValue="00" OutputType="Pattern"/>
      <PatternData InputType="Pattern" InputValue="01" OutputType="Pattern"/>
      <PatternData InputType="Pattern" InputValue="10" OutputType="Pattern"/>
      <PatternData InputType="Pattern" InputValue="11" OutputType="Pattern"/>
    </DataBlock>
  </Network>
  <Network LoadPath="AND.xml" SaveOnFinish="true" SavePath="AND.xml">
    <DataBlock Type="Run">
      <PatternData InputType="Pattern" InputValue="00" OutputType="Pattern"/>
      <PatternData InputType="Pattern" InputValue="01" OutputType="Pattern"/>
      <PatternData InputType="Pattern" InputValue="10" OutputType="Pattern"/>
      <PatternData InputType="Pattern" InputValue="11" OutputType="Pattern"/>
    </DataBlock>
  </Network>
  <Network LoadPath="xor.xml" SaveOnFinish="true" SavePath="xor.xml">
    <DataBlock Type="Run">
      <PatternData InputType="Pattern" InputValue="00" OutputType="Pattern"/>
      <PatternData InputType="Pattern" InputValue="01" OutputType="Pattern"/>
      <PatternData InputType="Pattern" InputValue="10" OutputType="Pattern"/>
      <PatternData InputType="Pattern" InputValue="11" OutputType="Pattern"/>
    </DataBlock>
  </Network>
</NXML>

Now, to run the neural network, we can invoke the nxml interpreter using the following command, in the command prompt.

nxml -start runGate.n.xml

Again, open runGate.n.xml to see the outputs.

File: runGate.n.xml after running it with nxml interpreter. Kindly see that OutputValues are predicted correctly.

<code><?xml version="1.0" encoding="utf-8"?>
<NXML>
  <Network LoadPath="or.xml" SaveOnFinish="true" SavePath="or.xml">
    <DataBlock Type="Run">
      <PatternData InputType="Pattern" InputValue="00" OutputType="Pattern" OutputValue="0" />
      <PatternData InputType="Pattern" InputValue="01" OutputType="Pattern" OutputValue="1" />
      <PatternData InputType="Pattern" InputValue="10" OutputType="Pattern" OutputValue="1" />
      <PatternData InputType="Pattern" InputValue="11" OutputType="Pattern" OutputValue="1" />
    </DataBlock>
  </Network>
  <Network LoadPath="AND.xml" SaveOnFinish="true" SavePath="AND.xml">
    <DataBlock Type="Run">
      <PatternData InputType="Pattern" InputValue="00" OutputType="Pattern" OutputValue="0" />
      <PatternData InputType="Pattern" InputValue="01" OutputType="Pattern" OutputValue="0" />
      <PatternData InputType="Pattern" InputValue="10" OutputType="Pattern" OutputValue="0" />
      <PatternData InputType="Pattern" InputValue="11" OutputType="Pattern" OutputValue="1" />
    </DataBlock>
  </Network>
  <Network LoadPath="xor.xml" SaveOnFinish="true" SavePath="xor.xml">
    <DataBlock Type="Run">
      <PatternData InputType="Pattern" InputValue="00" OutputType="Pattern" OutputValue="1" />
      <PatternData InputType="Pattern" InputValue="01" OutputType="Pattern" OutputValue="0" />
      <PatternData InputType="Pattern" InputValue="10" OutputType="Pattern" OutputValue="0" />
      <PatternData InputType="Pattern" InputValue="11" OutputType="Pattern" OutputValue="1" />
    </DataBlock>
  </Network>
</NXML>

Now, change the Output Type from Pattern to Array, and see what happens. You will get the exact output values in comma separated decimals if there are more than one neuron in the output layer (in this case, there is only one neuron in the output layer). Pattern data type always rounds the output to 1 or 0.

2.C) Illustration 2 - How To Use NXML for 'Brain Tumor Detection'

Now, let us see how you can create a neural network, train it and run it to detect brain tumors from the image of brain, using Neural XML.

I'm just trying to make things interesting. Of course, please understand that the samples used in this illustration are not 'real' images of the brain - they are just some 'virtual' images, and is meant purely for demonstration.

What We Are Going To Do:

Assume that we have the following images, and assume that each image is an x-ray of the brain. Each image has a size of 16 x 16 = 256 pixels.

We are using 13 images to train the network. According to the density of white pixels on a corner, we are assigning a value or condition (0,1,2 or 3) to each image, starting counter clockwise from the bottom left corner. The value of each image is shown below.

(1) =0 (2) =0 (3) = 1 (4) =1 (5) =2 (6)=2

(7) =3 (8) =3 (9) =3 (10) =3 (11) =2 (12) =1 (13) =0

We are using the density of white pixels on a particular corner, to detect the possibility of Brain Tumor. For example, see the first image. It has more white pixels at bottom left.

We assume that,

  • If the density of white is at bottom left corner, the condition is 0
  • If the density of white is at bottom right, the condition is 1
  • If the density of white is at top right, the condition is 2
  • If the density of white is at top left, the condition is 3

Let us define the following possibilities.

  • Condition 0 - No problem, brain has no tumor
  • Condition 1 - Some what infected
  • Condition 2 - Infected
  • Condition 3 - Critical, should change the brain ;)

I.e, for example, image 1 and 2 has no problem, image 3 and 4 is some what infected, image 5 and 6 is infected, image 7 and 8 is critically infected and so on.

Once samples are selected and conditions defined, we will,

  • Create a network which can learn from the samples
  • Train the network with a number of samples (Training phase)
  • Give an image to the network, and ask it to predict the condition (Running Phase)

Let us see how we can do this using Neural XML.

Step 1: Create A Neural Network

To create a network, we should determine

  • The number of neurons in input layer.
  • The number of neurons in hidden layer and the number of hidden layers
  • The number of neurons in output layer.

Let us see how to decide this

  • Neurons in input layer - As I mentioned earlier, we are providing a 16 x 16 image as input. When we digitize this picture, we can see that there are 16 x 16=256 pixels in each image. So, let us take 256 neurons in input layer - we will feed the value of each pixel (1 for white pixel and 0 for black) to each neuron in the input layer.
  • Neurons in output layer - We have four conditions - condition 0 (00 in binary), condition 1 (01 in binary), condition 2 (10 in binary), and condition 3 (11 in binary) - so, let us take two neurons in the output layer, because the highest output value we need (i.e, 3) requires two bits to represent it.
  • Neurons in hidden layer - Let us blindly assume that we have one hidden layer, and it has the number of neurons equal to the neurons in the input layer.

Now, let us generate the network, and save it to a file named DensityDetect.xml

nxml -gen 256,256,2 DensityDetect.xml

This will create a file named DensityDetect.xml

Step 2: Training The Neural Network

For training the neural network, let us create an nxml file, train.n.xml. All images are in the samples folder, relative to the folder where train.n.xml resides.

<code><?xml version="1.0" encoding="utf-8"?>
<NXML>
  <Network LoadPath="DensityDetect.xml" SaveOnFinish="true" SavePath="DensityDetect.xml">
    <DataBlock Type="Train" TrainCount="3000">
      <ImageData InputFile="samples\img1.jpg" InputWidth="16"
                 InputHeight="16" OutputValue="0" OutputType="Number" />
      <ImageData InputFile="samples\img2.jpg" InputWidth="16"
                 InputHeight="16" OutputValue="0" OutputType="Number" />
      <ImageData InputFile="samples\img3.jpg" InputWidth="16"
                InputHeight="16" OutputValue="1" OutputType="Number" />
      <ImageData InputFile="samples\img4.jpg" InputWidth="16"
                InputHeight="16" OutputValue="1" OutputType="Number" />
      <ImageData InputFile="samples\img5.jpg" InputWidth="16"
                InputHeight="16" OutputValue="2" OutputType="Number" />
      <ImageData InputFile="samples\img6.jpg" InputWidth="16"
                InputHeight="16" OutputValue="2" OutputType="Number" />
      <ImageData InputFile="samples\img7.jpg" InputWidth="16"
                 InputHeight="16" OutputValue="3" OutputType="Number" />
      <ImageData InputFile="samples\img8.jpg" InputWidth="16"
                 InputHeight="16" OutputValue="3" OutputType="Number" />
      <ImageData InputFile="samples\img9.jpg" InputWidth="16"
                 InputHeight="16" OutputValue="3" OutputType="Number" />
      <ImageData InputFile="samples\img11.jpg" InputWidth="16"
                 InputHeight="16" OutputValue="2" OutputType="Number" />
      <ImageData InputFile="samples\img12.jpg" InputWidth="16"
                 InputHeight="16" OutputValue="1" OutputType="Number" />
      <ImageData InputFile="samples\img13.jpg" InputWidth="16"
                 InputHeight="16" OutputValue="0" OutputType="Number" />
    </DataBlock>
  </Network>
</NXML>

Kindly note that, we used Image Data tag instead of Pattern Data tag. For Image Data tag, you can specify the InputFile attribute, which specifies the image. Along with the image path, you should specify the input image's width and height. If the image size is greater than this, the image will be resized to this size.

For each image, we specified the OutputValue as the number corresponding to the condition we discussed earlier. Now, let us start training. For example, for Image 1, the output value we provided to train the network is zero.

nxml -start train.n.xml

This will start the training. We are training the network 3000 times. It will take some time, so go and have a cup of coffee ;)

Step 3: Running The Neural Network

Once the network is trained, you can use it to check image samples. To illustrate this, let us create an nxml file to run the network. We are going to detect the following images.

(1) (2) (3) (4) (5) (6) (7) (8)

The run.n.xml file is given below. All files are in test folder, relative to the folder where run.n.xml resides. Please note that any of these images are not among the list of images we used for training.

File: run.n.xml before executing it using nxml

<code><?xml version="1.0" encoding="utf-8"?>
<NXML>
  <Network LoadPath="DensityDetect.xml" SaveOnFinish="true" SavePath="DensityDetect.xml">
    <DataBlock Type="Run">
      <ImageData InputFile="test\testimg1.jpg" InputWidth="16"
       InputHeight="16" OutputValue="3" OutputType="Number" />
      <ImageData InputFile="test\testimg2.jpg" InputWidth="16"
       InputHeight="16" OutputValue="2" OutputType="Number" />
      <ImageData InputFile="test\testimg3.jpg" InputWidth="16"
       InputHeight="16" OutputValue="2" OutputType="Number" />
      <ImageData InputFile="test\testimg4.jpg" InputWidth="16"
       InputHeight="16" OutputValue="1" OutputType="Number" />
      <ImageData InputFile="test\testimg5.jpg" InputWidth="16"
       InputHeight="16" OutputValue="2" OutputType="Number" />
      <ImageData InputFile="test\testimg6.jpg" InputWidth="16"
       InputHeight="16" OutputValue="3" OutputType="Number" />
      <ImageData InputFile="test\testimg7.jpg" InputWidth="16"
       InputHeight="16" OutputValue="1" OutputType="Number" />
      <ImageData InputFile="test\testimg8.jpg" InputWidth="16"
       InputHeight="16" OutputValue="1" OutputType="Number" />
    </DataBlock>
  </Network>
</NXML>

Now, let us run the network by issuing the following command.

nxml -start run.n.xml

Now, have a look at the run.n.xml again.

File: run.n.xml after executing it using nxml. You can find that the neural network wrote all the output values correctly, by detecting each image properly.

<code><?xml version="1.0" encoding="utf-8"?>
<NXML>
  <Network LoadPath="DensityDetect.xml" SaveOnFinish="true" SavePath="DensityDetect.xml">
    <DataBlock Type="Run">
      <ImageData InputFile="test\testimg1.jpg" InputWidth="16"
                 InputHeight="16" OutputValue="3" OutputType="Number" />
      <ImageData InputFile="test\testimg2.jpg" InputWidth="16"
                 InputHeight="16" OutputValue="2" OutputType="Number" />
      <ImageData InputFile="test\testimg3.jpg" InputWidth="16"
                 InputHeight="16" OutputValue="2" OutputType="Number" />
      <ImageData InputFile="test\testimg4.jpg" InputWidth="16"
                 InputHeight="16" OutputValue="1" OutputType="Number" />
      <ImageData InputFile="test\testimg5.jpg" InputWidth="16"
                 InputHeight="16" OutputValue="2" OutputType="Number" />
      <ImageData InputFile="test\testimg6.jpg" InputWidth="16"
                 InputHeight="16" OutputValue="3" OutputType="Number" />
      <ImageData InputFile="test\testimg7.jpg" InputWidth="16"
                 InputHeight="16" OutputValue="1" OutputType="Number" />
      <ImageData InputFile="test\testimg8.jpg" InputWidth="16"
                 InputHeight="16" OutputValue="1" OutputType="Number" />
    </DataBlock>
  </Network>
</NXML>

Conclusion

That is it for now. As I mentioned earlier,

just if you haven't done that yet.

In my next article, we will discuss how NXML is formulated, but even before that, have a look at the source code and see how nxml actually works (just if you are smart enough).

In the mean time, have a look at my website, Amazed Saint Blogs, here at http://amazedsaint.blogspot.com/ . You can download a lot of source code and this kind of articles there, and subscribe to the news letter to get information regarding new project releases, new article releases etc.

Post your comments, not only for this article, but also for my previous articles. And let me know what kind of topics you are more interested in. Genetic Algorithms? Cellular Automata? Meta Coding? or something else.

NXML and BrainNet is just in its beta stage, and frankly, it hasn't fully undergone unit testing it. So, found any bugs? Please report it.

Want to support Amazed Saint Articles, Brian Net or nxml? Consider a small donation here.

Have a nice time, enjoy (if you can't enjoy due to work stress, or to improve your mental and physical health, practice some yoga, take some Ayurveda medicines etc. And, better, please do the Art Of Living healing breath workshop here http://www.artofliving.org/ to uplift your intellect, mind and soul.)

Tech Bits, Tech News, Emerging Trends